| INSTALLATION
Timber is a natural and variations in colour, texture and other natural features occur between pieces and batches of the same species. Sanding and finishing also causes variations in appearance.Care should be taken in making a selection based on a single sample. In all cases, timber flooring supplies in job lot quantities will contain some variations from job to job and from the samples on display.Timber flooring, whilst dried during production, continues to take up and give up moisture during its life, depending on whether, aspect and local conditions. In so doing, some movement and changes to the surface of your floor are to be expected and will be apparent. This is normal and may include checking and fine cracks on and between boards and changes in colour.
With a concrete slab we install either Battens or plywood, both are nailed onto the concrete slab with 50mm anchors, and then we nail the new floor boards on to the battens or plywood with heavy duty staples; which is known as secret nailing. We leave 10mm gap from each wall as an expansion gap and then cover it up with Beading, Scotia or your selection of Skirting board.
Installation of Floating Floorboards. (15mm Pre-finished Flooring)
With Floating floorboards it could be installed to, Plywood, Concrete slab or any existing flat surface only. This type of flooring is more suitable for units and townhouses. The floating is layed with 2mm foam underlay which cuts noise by 35% and is only glued together between the tongue & Groove (T&G) with a construction grade water based adhesive. We again leave 10mm gap between the walls to allow expansion, These gaps are covered with 19mm Matching Beading, Scotia , Quad or your choice of Skirting board.
Sanding & Finishing.
After the Installation an acclimatization period of 10 days to 2 weeks is required for the timber to get used to its nailed form, after this period we come in and begin the sanding and polishing.
SANDING AND FINISHING TIMBER FLOORS Introduction
Outlined in this data sheet are aspects that should be considered when sanding and finishing timber floors.The sanding and finishing process is particularly important to the overall performance and appearance of thetimber floor and is an area that offers a wide array of methodologies and coating systems. The practicesoutlined are those employed broadly throughout the industry, however, variations of sandpaper grades andprocedures are common. The aim in all cases is to provide a smooth surface with the desired surface coating suitably applied to give an even level of sheen across the body of the floor.
Assessing the floor prior to Sanding
Prior to sanding the condition of the floor should be assessed to ensure that it is in a condition suitable forsanding. This may include assessing vertical movement at board or end-matched joints, an appraisal of theoverall condition of the floor (e.g. degree of cupping in boards, gapping at board edges, signs of moisture). Ifthere are signs of abnormal moisture content, it should also include taking and recording moisture contentsof the installed floor. This ensures a complete history of the floor, should issues arise in the future. Anyissues should be provided in writing to the applicable person (e.g. principal contractor, owner) and anappropriate course of action taken. It is good practice to let the floor "settle" for a period, which may be threeto 14 days before the sanding process takes place. This period is also beneficial for curing of adhesives where utilised.
Preparation for Sanding
Punching Nails and filling nail holes
Before the sanding process can begin, ensure that all nails are punched a minimum of 3 mm below thesurface of the boards. Any nail that is not suitably punched will potentially damage the sanding equipmentand affect the sanding process. It is important to note that secret nailed floors may have been top nailedadjacent to a wall or other areas where access is limited.The punched nail holes can then be filled with either oil or non-oil based filler. Oil-based fillers may bleed oilinto the timber and affect the colour of the wood surrounding the nail hole, or may not be compatible withvarious coating products. The colour of the filler should be carefully selected to minimise any visual impact ofthe filler. Many of these products are sold in colours pre-matched to specific species. In mixed species floorsor where significant colour variations are present, it is usual to mix or select a neutral colour that is slightlydarker than mid range between the extremes of colour. Generally all fillers are slightly darker and this allowsfor the boards to deepen in colour following finishing and UV exposure.To any imperfections and/or grain, apply grainfiller prior to the first coat. Grainfiller needs to be water based,not acrylic or latex. Filling should be done at this stage or after the first coat of finish is applied. By filling afterthe first coat any potential for the filler to impact on the surrounding timber through bleed or moisture is minimised. In all cases the filler must completely fill the hole so as not to impact on the finish quality.
Cleaning
The floor requires thorough cleaning to make it free from dirt, grit and debris. These particles, if not removed,can cause deep uneven scratching in the timber surface, requiring substantial additional sanding to remove.The floor should initially be swept followed by vacuuming, paying particular attention to areas which are noteffectively cleaned by sweeping, such as gaps underneath the skirting, corners, window sills and the like. Thevacuum should have sufficient capacity in terms of both suction and filtration to satisfactorily clean the floor.It is important to remove any materials that may potentially impact on either the sanding or coating process. Additional care should be taken with silicone-based sealants that may have been dropped onto the floor.
Timber floor sanding and finishing
These products can potentially be widely spread through the sanding process, impacting on the bond between the coating and the timber.
Protection
During the sanding and finishing process it is imperative that access to the area of the work be restricted. Anytradesmen working in or around the area can potentially generate dust, wet the floor, introduce silicone basedmastics and sealants, walk over the area or generally contaminate it. Clear instructions should also be givento the owner or occupants regarding access, not opening windows which may blow dust over the area, and time required for coating systems to adequately cure.
Sanding
The sanding operation will vary based on the condition of the floor and the hardness of the flooring species.Where the floor is being sanded for the first time, the sanding process is made up of a number of separatesanding stages, which generally start with a coarse paper and progress to a relatively fine grade of paper. Itshould be noted that the sanding process is effectively scratching off the surface of the boards, and thereduction in grades of paper means that you start with a severe scratching action and finish with a more subtle scratching action.
Level / Basic Sanding
The level/basic sand, as the name suggests, is to cut the boards level, taking out any ridges or high points inthe floor. It typically comprises of three passes with the sanding machine. The level or basic sanding is toprovide a level, completely sanded floor - each of the sanding procedures that follows this step is designed toremove the sanding scratches generated by this initial step.Pass 1 is done from a small angle or up to a 45 degree angle to the direction of the grain (diagonally). Thisangle is dependent upon the layout and size of the area to be sanded. A coarser grade of paper is used,depending upon the species and the condition of the boards. A lower grade of paper may be used toenhance the effectiveness of the sanding process in a floor that is very uneven or with hard timbers such as Turpentine or Ironbark.
Each room is sanded starting at a point, which will allow the longest path of travel at approximately 45degrees (or as is deemed appropriate given the room parameters) to the grain direction (run of boards). Themachine is started, ensuring that the drum is not touching the boards and walking slowly forward, the drum iseased onto the boards. A slow walking pace and consistent pressure is maintained. At the end of the passthe drum is raised smoothly off the floor and then by walking backwards, pulling the machine, it is eased backonto the floor for the return pass. The power lead, controlled by the operator, must be kept well clear of the drum.
When the original starting point is reached the drum is again gradually raised off the floor. The machine isthen moved to the right or left hand side of the first path, ensuring an overlap to the first cut path. Sandingcontinues in that direction, sanding strips and maintaining a similar overlap in each forward and backwardpass. When the limit of accessibility has been reached in the corner of the room, the machine is brought backto the starting point and the remainder of the floor is sanded in the same direction and manner but to theopposing side of the first cut. That is, if sanded to the left of the first cut, sanding then takes place to the rightof that first cut, ensuring that there is an overlap of around 200 mm between the two sides of the floor.The second pass is carried out on the opposite diagonal to Pass 1, using a similar grade paper.The third pass continues in the direction of the boards, using a similar grade paper to remove the sandinglines from the action of pass 1 & 2. Typically the operator should start at a point that is a few metres off theside wall. The process of walking speed and easing the drum onto the floor is as previously described.Once a forward and reverse path is sanded, the machine is moved, ensuring an overlap to the previous cutand sanding recommences in the same manner. This process is carried out across the room. When the fullwidth of the room is sanded, the operator should turn 180 degrees and sand the unsanded band of floor.At the completion of the level or basic sanding the boards should be generally smooth and free from cupping,and mismatching of surface levels between adjacent boards. If this has not been achieved the floor will require additional passes to achieve this state.
The sanding drum should never contact the floor unless moving forward or backward. Doing so will cut agroove into the floor (drum mark), which may not be recoverable. Specialist equipment and manufacturers’ recommendations, and user instructions should be followed.
Edging
The sanding machine will not be able to sand the boards along the edges of the room, in corners or areas ofreduced access such as wardrobes etc. In these areas the boards need to be sanded level and generallyblended into the body of the floor. For these areas an edge sander is used. In all cases, care is necessary toensure that the operation does not dig grooves into the boards and the finished edge is level with the body of the boards.
The most commonly used machine for the edging process is the disc sander. When using this machine, theoperator should move the machine in a smooth even pattern at board ends and across the grain. The patternof sanding should overlap and blend into the body of the sanded floor. It is important that the machine is heldlevel as the boards are easily grooved with any uneven pressure. On each movement, the machine shouldsand approximately 50 mm section of unsanded floor. Along walls, the edge sanding machine should besmoothly moved, back and forth, overlapping some 100 mm into the body of the sanded floor.For the purpose of edging on new and old floors, in good clean condition, finer grit papers are usually sufficient to achieve a colour match to the center of the floor.
It may be necessary in areas of very limited access or at the corners of the room, to hand scrape the floor.The scraping action should always be in the direction of the grain with the surface being hand-sanded ormachine-sanded with a smaller machine i.e. orbital sander. With orbital sanders too much pressure or use ofan overly aggressive grade of paper can result in deep swirl marks, which will show up in the finish. Onceagain, care needs to be taken to blend in these hand scraped areas with the body of the floor.
This process is repeated following the second sanding process of the body of the floor.
Finish Sanding
The finish sanding operation involves two separate stages of operation.Stage 1 - Initial CutsThe initial cuts utilise a finer grade of paper than that used in the level or basic sanding operation. Typicallyan F60 - 100 grade paper is used and the floor is sanded in the direction of the grain (board run). Thepurpose of the initial cuts is to smooth off the coarse sanding marks left by the level or basic sanding. Once asuitable level of smoothness is achieved, the final stage of sanding may be carried out.Stage 2 - Final SandThe final sand utilises an even finer grade of paper - once again reducing the depth of scratching andpreparing the floor for the coating system. The floor must once again be fully cleaned of dust, grit and debris.Any matter left on the floor will invariably impact upon the quality of the finish.Typically, the final sand is carried out using a rotary sander, plate orbital sander or similar machine with a 100- 150 grade paper or screenback. The sanding should be carried out in the direction of the grain, ensuring asmooth action and applying a balanced control of the machine. If a water-based coating system is specifiedthe final sand may need to be carried out using a new or worn 150 mesh screenback dependant on thesystem being used (See manufacturers recommendations). The floor is then vacuumed thoroughly and ifrequired tack rag cleaned. Special attention should be paid to any potential dust traps in the floor (dig out anydirt or dust and vacuum away). These can contaminate the floor coating system if not cleaned adequately, asthe applicator will most certainly pull the dirt onto the body of the floor. It should also be noted that heavysanding equipment may have the potential to create wheel marks on low density floor boards. Additional care should be taken in these applications.
Coating System Application
The following information is a typical application methodology, which might be utilised for the various finish types with minor product specific variations.
Cleaning
The floor finish will be easily contaminated with any dirt, dust or other extraneous matter left on the floor. It isessential that the area be thoroughly cleaned / vacuumed, paying particular attention to any areas which mayhave caught dust during the sanding process, such as window sills, picture rails, skirtings, power and lightswitches, light fittings, handrails, etc. The floor needs to be well lit with adequate ventilation. It is importantnot to have draughts blowing across the floor during the process as they may well introduce contaminates from outside of the actual working area.
Mixing the Coating
The coating material should be well and thoroughly mixed so that all the solids are blended through the bodyof the liquid. Care should be taken not to stir too quickly or roughly as this may introduce air bubbles to thematerial, impacting on the coating quality. If there are any additives to be used, ensure that they are mixed thoroughly into the coating liquid. In all cases follow the manufacturers’ instructions.
Cutting In
Using a clean, good quality brush, cut in the finish around the perimeter walls and any other obstructions orareas which may not be accessible to the main applicator. The cutting in should extend out approximately150 mm into the body of the floor so that the applicator is not required to venture too close to the skirtings
and other limited access areas. If any bristles fall out of the brush into the finish, remove immediately.
Applying Coating
The initial coat applied to the raw sanded timber may be either a recognised sealer coat as prescribed by thecoating manufacturer or the same material to be used as a finish, except when outside the manufacturers’recommendations. Sealers are available in both water-based and solvent-based products. The use of asealer can enhance the development of colour in the timber floor and can reduce the risk of "edgebonding”.Penetrating and low rupture sealers are available. In all cases it is imperative to closely follow manufacturers’ instructions.
There are many approaches and methods used in the application of floor finishes and coating systems. Thefollowing approach is one such application method, which has generally been accepted by the industry.The applicator as specified by the coating system manufacturer (often a 6 mm Mohair roller or equivalent) isimmersed in the coating contained in a large painter’s tray or applicator bucket. These allow the applicator tobe lightly squeezed on the shallow portion of the tray to avoid drips. Applying the product to the boardsshould be carried out in a smooth action, starting at one end of the boards and working the product in-linewith the grain of the timber boards. The finish should be feathered off at the outer edge to minimise anybuildup of coating at that point. This process should leave a "wet edge” so that each successive section ofapplication blends into the previous section without any ridging, which can occur if the material skins or dries off before the next application strip.
The application process should continue in the same manner working from one end of the area to completion. An even, wet look should result without any dry patches.
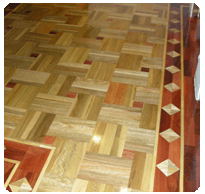
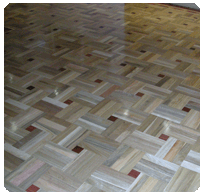
Filling/Stopping
It is recommended when coating parquetry floors, that filler be applied first to fill any open grain orimperfections. Once dry sand and apply the first coat. This aids in reducing the phenomena known as"quilting" where the finish does not flow across joints at board or parquetry edges. Filling of parquet floorsmay be carried out prior to or following the application of the initial sealer or first coat, and is at the discretionof the floor sander. It is generally not a recommended practice to fill tongue and groove timber floors.Any nail holes not previously filled and any cracks or other open faults should now be filled with a suitablefilling compound that is compatible with the finish type. (Note: ensure that the coating system is dry)Generally, a non-oil based filler is best which is suitably colour matched to the timberThe filler should be installed with a clean bladed applicator. Ensure that the filler slightly overfills the hole andhas been fully pushed into the void. If the material is not completely filling the void, it may potentially comeloose in service. Clean off any filler that is spread over the floor surrounding the hole. Any excess will be sanded away in the light sanding between coats.
Sanding Between Coats
The floor will typically have a slightly rough feel to it after the first coat of finish, depending on the systemused and the degree of grain raise of the timber created. It is normal for more open grain timbers to exhibit ahigher degree of initial grain raise than denser close grain species. The floor requires a light sand after thefirst coat to remove this roughness and to also key the surface for the next coat of finish. A 150 or finer gritpaper or screenback is used at this stage with a rotary sander or similar. It is imperative that the sandingdoes not expose the timber as this will create further raised grain. The sanding process is required to smoothoff the roughness in the coating, not the timber. Edges must be hand or orbital sanded to a similar smoothness.
Cleaning between coats
All dust should again be thoroughly removed from the floor along with any potential dust traps as previouslydescribed. Ensure that there are no draughts blowing through the area that could contaminate the finalcoat(s). In addition it may be prudent to use a tack rag over the floor to remove any dust missed by the vacuum. This will ensure that the floor is as clean as possible for the final coat(s).
Second Coat
The floor should again be edged with a clean brush coming out some 150 mm or more into the body of thefloor. The application process is as per the first coat with the applicator being worked along the full lengths of the boards and lightly feathered at the outer edge of each strip of application.
Additional Coats
Any additional coats shall follow the same process of light sand of the previous coat, thorough cleaning andapplication of the coating. Typically a three-coat system is utilised, however, all manufacturers’recommendations should be followed in regards to number of coats, time between re-coats and sand papergrades, in addition to any requirements of the specifier. Various water-based and oil-based coating systemsrequire a finer grit of paper between coats compared to the solvent-based products.
There are a number of finishes for contemporary timber floors, including solvent based polyurethane*, oil based sealer and more recently developed water based urethanes.
We recommend you discuss floor care with your flooring installer and if possible obtain maintenance procedure data sheets from the manufacturer of your chosen floor finish, however the following hints will help you to keep them looking their best.
Oil and Urethane finishes
Modern acrylic polishes take the hard work out of oil and urethane finishes. It is essential, however that the floor is kept free of dirt and grit, by sweeping it thoroughly with an electrostatic sweep mop.
Note: Oil impregnated sweep mops must not be used as residues may be left and these could cause slip hazards. Electrostatic mops must always be kept clean. If available, a high speed burnisher (Polivac or similar), will help remove ground in dirt and also harden and re-level acrylic polishes.
Polishing
Less frequently, and depending upon foot traffic levels, it will be necessary to scrub the floor with a suitable cleaner and once dry, apply a coat/s of polish with a mop. In domestic applications the floor should be dry buffed from time to time. In commercial situations, planned maintenance schedules usually call for regular dry buffing.
Restoration
Floors with oil and urethane finishes can be easily renovated by a light sanding and the application of a suitable surface coating. Heavy machine sanding is necessary only in cases of heavy wear, but the advice of a professional is recommended.
Acclimatisation |